Processing a New List
To process a new list:
1. From
the toolbar, select Marketing & Communication
> Communication Production Control.
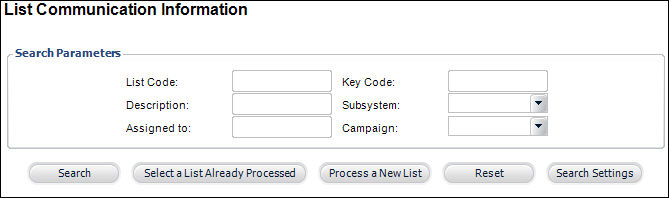
The List Communication Information search screen displays.
 You can also
access this screen from the Marketing Launch screen by clicking “Generate
Communication to List Members.”
You can also
access this screen from the Marketing Launch screen by clicking “Generate
Communication to List Members.”
2. Click
Process a New List.
The List Communication Information screen displays, as shown below.
3. From
the Define List Communication section, edit the system generated Key Code, if necessary.
4. By
default, the logged in user is assigned to this list. If necessary, click
the Assigned To link to select
a different user to assign to this list.
5. Click
the List Code link to select a
list from the database.
6. If
you are creating a list that is marketing-related, click the Market
Code link to select a market code from the database.
7. The
Communication Description defaults
to “Key Code” + [Key Code]. If necessary, change this description.
8. If
necessary, select the Subsystem
to which this list applies from the drop-down.
For example, the Exhibition subsystem may involve the necessary contact
of individuals or other companies in a marketing effort to advertise information
about an upcoming association exhibition.
9. If
necessary, select the Department
to which this list applies from the drop-down.
Options in the drop-down are populated based on the codes defined for the
non-fixed MKT “DEPARTMENT” system type.
10. By
default, the Destination Vendor
is “Personify”. To process a list for Lyris, select “Lyris”.
For more information, see Sending
a List to Lyris.
11. If
you want to Exclude Customers Who Have
Requested “Do Not Call” Status, check the checkbox.
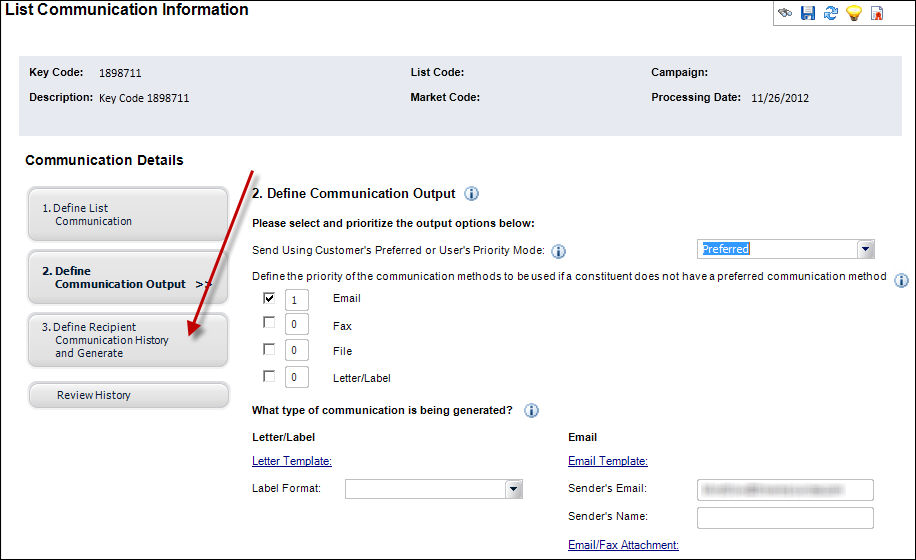
12. Click
2. Define Communication Output,
as highlighted below.
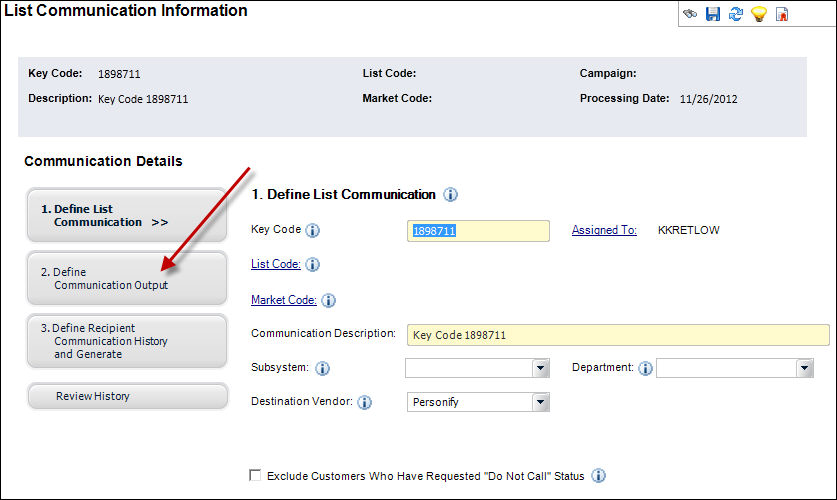
The Define Communication Output screen displays, as shown below.
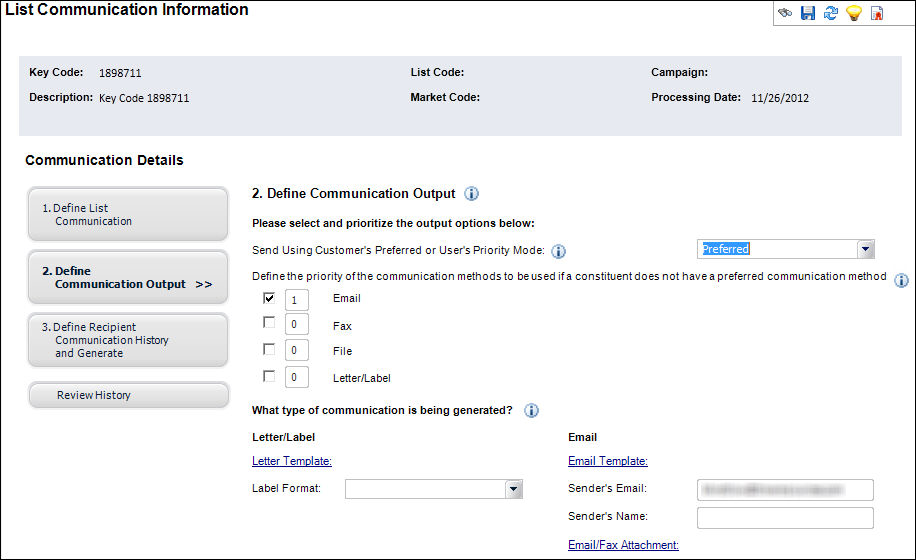
13. From
the Send Using Customer’s Preferred or
User’s Priority Mode drop-down, select if you want to send using
customers’ preferred type of communication (Preferred) or based on the
your organization’s preference (Priority).
14. Select
the checkboxes next to the priority methods (Email, Fax, File, or Letter/Label)
in the order you want them to be sent.
The system will assign a number to each category with a 1 next to the first
method you select.
Even if you
have selected to use the customer’s preferred method of communication,
you should determine an order for subsequent methods of communication,
to account for those users who have not specified a preferred means of
contact.
15. To
define letter communication, perform the following:
a. From
the Letter/Label section, click the Letter
Template link to select the appropriate template as defined.
b. If
the communication is a label, select the Label
Format from the drop-down.
Options in the drop-down are delivered with Personify and un-editable.
16. To
define email communication, perform the following:
a. From
the Email section, click the Email Template
link to select the appropriate email template as defined.
b. Enter
the sender’s name and email address in the Sender’s
Email and Sender’s Name
fields.
17. Click
3. Define Recipient Communication History
and Generate, as highlighted below.
The Define Recipient Communication History and Generate screen displays,
as shown below.
18. To
create a contact tracking history of this communication, perform the following:
a. Check
the Create Contact Tracking checkbox.
b. If
necessary, select the Call Topic of the contact tracking record to be
created from the drop-down.
Options in the drop-down are populated based on the codes defined for the
non-fixed MRM “CALL_TOPIC” system type.
c. If
necessary, select the Subject of the contact tracking record to be created
from the drop-down.
Options in the drop-down are populated based on the subcodes defined for
the non-fixed MRM “CALL_TOPIC” system type.
19. To
create a fundraising appeal activity of this communication, perform the
following:
a. Check
the Create Fundraising Appeal Activity checkbox.
b. If
necessary, select a Campaign from the drop-down.
Options in the drop-down are populated based on the campaigns defined on
the Campaign Definition and Maintenance screen. For more information,
please see Defining Campaigns.
c. If
necessary, select a Fund from the drop-down.
Options in the drop-down are populated based on the funds defined on the
Fund Definition and Maintenance screen. For more information, please see
Defining Funds.
d. Select
an Appeal from the drop-down.
Options in the drop-down are populated based on the appeals defined on
the Appeal Definition and Maintenance screen. For more information, please
see Defining Appeals.
e. Select
the Appeal Type from the drop-down.
Options in the drop-down are populated based on the codes defined for the
non-fixed FND “APPEAL_ACTIVITY” system type.
20. Click
Generate Communication.
The system runs the MKT800 batch
process. A confirmation pop-up window displays asking you if you wish
to review the status of the job.
To open the
Submission Status screen and view the status of your Generate List Communication
job, simply click Status. From this screen, you can also see the status
of all previous Generate List Communication jobs.
| Screen Element |
Description |
Define List Communication |
| Key Code |
Text field. The system generates a key code that identifies
this specific communication. The key code represents a combination
of list code (which identifies who received the communication)
and the market code (which identifies the content of the communication).
You can change this code to be more applicable to your organization. |
| Assigned To |
Link. This field defaults to the currently logged in user.
You can click the link to display a list of users to assign the
list communication to. |
| List Code |
Link. Before a communication can be sent to customers, you
must select the marketing list by clicking the List Code link.
This is a required field. |
| Usage Limits |
Link. This field only appears when the selected list’s creation
method is Prospect List Import or if the selected list is a merged
list containing one or more Prospect List Import lists. Click
to display the List Usage Rules screen and view the defined restrictions.
|
| Market Code |
Link. When used, a market code identifies the content of the
communication being sent to customers on the selected marketing
list. This field is not required, but if the communication is
marketing-related, it is recommended that a Market Code be assigned
so that you can analyze the effectiveness of the selected set
of customers and track the marketing message. If the communication
is not a solicitation, a market code should not be assigned. |
| Communication Description |
Text field. Enter a description for this list communication
in this field. |
| Subsystem |
Drop-down. This field allows you to assign a subsystem to the
communication to help categorize all your lists. If your organization
creates many list communications, selecting a value for subsystem
will help you keep these lists organized. This field is optional. |
| Department |
Drop-down. This field allows you to categorize your communication
by department. If your organization creates many list communications,
selecting a value for department will help you keep these lists
organized. This field is optional. |
| Destination Vendor |
Drop-down. Click the drop-down to select the user-defined destination
vendor code. Once defined, this information can be sent to a third-party
marketing application. |
| Exclude Customers Who Have Requested “Do Not Call” Status |
Checkbox. You can define your communication to generate a data
file, which can generate a call list with customer names and phone
numbers. If this is the case, select this checkbox to exclude
those customers who requested to be put on the “Do Not Call” registry. |
| Exclude Market Code Duplicates |
Checkbox. This checkbox appears after selecting a market code
and tabbing out of the field. A communication being used to send
a purchase or donation solicitation to customers can be marked
to exclude customers who have already used the market code defined
with this communication in an order or contact tracking record. |
| Follow List Rules |
Checkbox. This checkbox appears when a list with the creation
method: Prospect List Import has been selected. This flag enforces
any restrictions defined with the imported list. |
Define Communication Output |
| Send Using Customer's Preferred or User's Priority Mode |
Drop-down. Communications can be sent to the customers on a
marketing list based on either the customer's preferred method
of communication (Preferred) or based on the user's preferred
method of communication (Priority). If "preferred" is
selected, specify the priority order to be used to select a communication
method for customers who have indicated their preferred method
of communication. |
| Email |
Checkbox/Number field. Select the checkbox to define the priority
order for sending an email. The number field defaults to the order
you select email, fax, file, or letter label. |
| Fax |
Checkbox/Number field. Select the checkbox to define the priority
order for sending a fax. The number field defaults to the order
you select email, fax, file, or letter label. |
| File |
Checkbox/Number field. Select the checkbox to define the priority
order for sending a file. The number field defaults to the order
you select email, fax, file, or letter label. |
| Letter/Label |
Checkbox/Number field. Select the checkbox to define the priority
order for sending a letter. The number field defaults to the order
you select email, fax, file, or letter label. |
| Letter Template |
Link. Click the link to select a predefined letter template.
|
| Email Template |
Link. Click the link to select a predefined email template. |
| Label Format |
Drop-down. Click the drop-down to select a predefined label
format. The formats include various labels, address labels, return
address labels, etc. |
| Sender's Email |
Text field. Enter the email address you want to display as
the return address. |
| Sender's Name |
Text field. Enter the name you want to appear as the sender.
|
| Email/Fax Attachment |
Link. Click the link to select a file to attach to an email
or fax. |
Define Recipient Communication
History and Generate |
| Create Contact Tracking |
Checkbox. To create a contact tracking record for each customer
on the marketing list, select this checkbox, then select a topic
and optional subtopic.
As of 7.4.1SP1, for contact tracking
records created via MKT800, the system will default the Person
Contacted to the Last_First Name of the customer on the record. |
| Call Topic |
Drop-down. Click the drop-down to select a call topic to assign
to the list communication. |
| Subject |
Drop-down. Click the drop-down to select a subject for the
list communication. |
| Create Fundraising Appeal Activity |
Checkbox. To create a fundraising appeal activity record for
each customer on the marketing list, select this checkbox and
select a fund or campaign and an appeal and appeal activity code.
|
| Campaign |
Drop-down. Click the drop-down to select a campaign to assign
to the list communication. |
| Fund |
Drop-down. Click the drop-down to select a campaign to assign
to the list communication. |
| Appeal |
Drop-down. Click the drop-down to select an appeal to assign
the list communication. |
| Appeal Type |
Drop-down. Click the drop-down to select an appeal type to
assign to the list communication. |
| Generate Communication |
Button. The system runs the MKT800 batch process. A confirmation
pop-up window displays asking you if you wish to review the status
of the job. Click Yes if you want to review the status. |
|