
The instructions that follow detail the step by step process on how to install the new DNN Web Control Container and Web Controls on your site. Before you install the Web Controls, be sure to read the descriptions of each web control to get an idea of what the function is, how it is displayed on your site, and how to best utilize your control.
To get started with DNN Container and Web Controls:
1. Log into your site as host.
2. Navigate to the appropriate page on your site where you want to add the DNN Web Control Container (see Adding and Managing Pages for more information).
3. In
the Mode section, select the Edit radio button, as highlighted
below (see Using
the Personify e-Business Control Panel for more information about
the functionality of the Mode radio buttons).
4. From
the Host module, select the Add New Module
radio button, as highlighted below (for more information about
the functionality of the Add New Module and Add Existing Module radio
buttons, see Personify
e-Business Control Panel).

 The
Add Existing Module radio button allows you to add an existing module
to the page. It copies and pastes the content of the existing module into
the new page (see Using
the Personify e-Business Control Panel for more information).
The
Add Existing Module radio button allows you to add an existing module
to the page. It copies and pastes the content of the existing module into
the new page (see Using
the Personify e-Business Control Panel for more information).
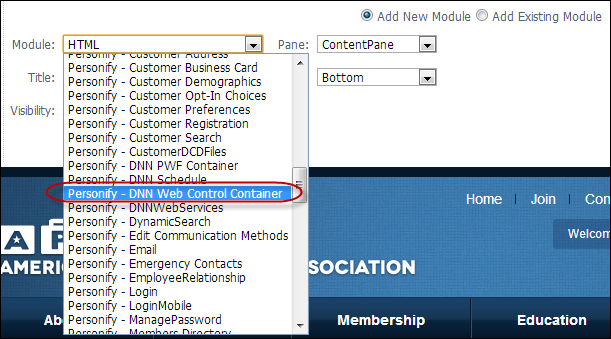
5. From
the Host tool bar, in the Module drop-down,
select "Personify-DNN Web Control Container, as highlighted below.
6. If necessary, from the Host tool bar, in the Title text box, enter a unique title for the page.
7. From the Host tool bar, in the Visibility drop-down, select one of the following:
a. Same As Page: this is the default option and uses the same permissions for the page and applies them to the .NET control.
b. Page Editors Only: this option only allows individuals who have host access to be able to view this control.
8. From the host toolbar, in the Pane drop-down, select one of the following:
a. TopPane
b. ContentPane
c. BottomPane
d. RightPane
9. From the Host tool bar, in the Insert drop-down, select one of the following:
a. Top
b. Above
c. Below
d. Bottom
10. Click
Add Module To Page, as highlighted
below.

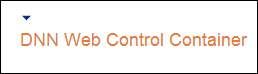
The DNN Web Control Container Module displays on the page, as shown below.
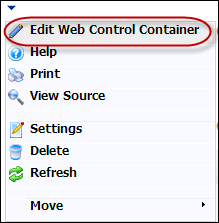
11. Select
Edit Web Control Container option
from the downward arrow icon, as highlighted below (see Using
the Module Options for more information on the container's settings).
The Select A Web Control window displays, as shown below.

12. Search and select the .NET Control that you want to render for this module. This will load all the available settings for this web control. For more information about each .NET Control setting see .NET Web Controls Descriptions.
If
you do not want the name "DNN Web Container Control" to display
on your e-Business site, you need to uncheck the Display Container checkbox
in the module's settings. See Using
the Module Options for more information.
13. Configure the settings of your selected web control. For more information, please see .NET Web Controls Descriptions.
14. Click
Save.
You will be taken back to your current designing page . The web control
rendered will be with the control feature that you just set up.
Container Usage Details
The list of the compatible Personify Web Controls to be used with the container includes the Web Controls that are developed with the PersonifyWebStandAlone attribute.
All
of the compatible Personify Web Controls also need to be inside an assembly
with the following naming pattern: “.WebControls.*.UI.dll” (i.e., Personify.WebControls.Store.UI.dll).
When
you are choosing a web control for the first time, the container will
load the default values for each control setting if they are available.
After you have completed setup on your first control, the system will
load using the previous settings that you specified. You can also click
“Load Default” to get back to the initial default values.