 Credit
card numbers are treated as Presettled.
Credit
card numbers are treated as Presettled.
The Lockbox Processing and Error Correction screen (LCK001) is an interactive screen that allows users to view a holding table of uploaded data and correct any errors. Based on the error message, consult the paperwork from the bank to perform the corrections. One example of an error is a missing order number and customer number. The member might not have returned the proper paperwork with the payment and, therefore, the order and customer number might be missing. In this case, look up the customer by name, find the relevant order, enter the order number on the lockbox correction screen. If there is no order and/or you are not sure to what order to apply the money, create an unapplied receipt for this payment. If the customer is not in the system, create a customer based on the name and address on the copy of the check.
Once the errors have been corrected, the user can then validate and post transactions individually or in groups.
Credit
card numbers are treated as Presettled.
To review your lockbox data:
1. From the toolbar select Accounting > Accounting Central.
2. From the Lockbox task category, click Lockbox Error Processing.
3. Search
for and select a record.
The Lockbox Processing and Error Correction Details screen displays, as
shown below.
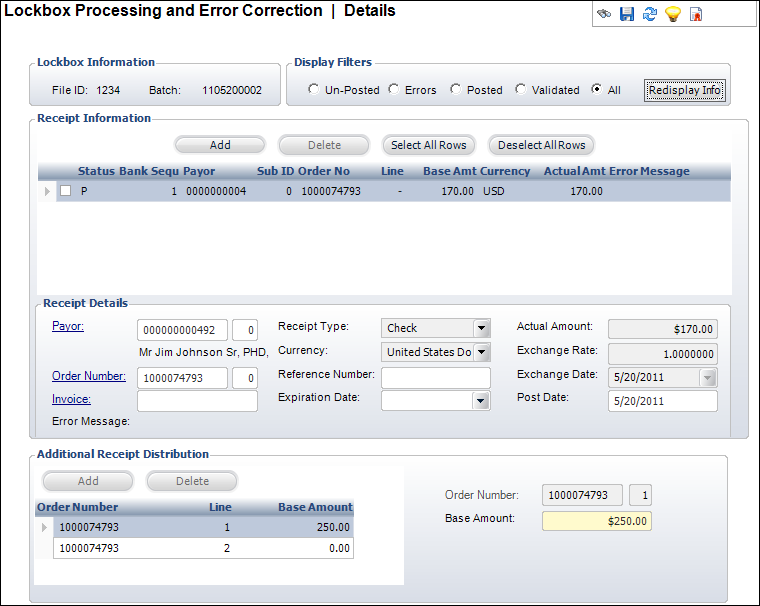
4. Click
one of the Display Filter radio
buttons and click Redisplay Info.
This will update the table to only include applicable receipts.
5. From the Receipt Information table, select a receipt.
6. If
applicable, correct data.
For example, a missing customer number, order number, etc.
7. If applicable, click Add to add a missing transaction to the batch.
8. Fill in the necessary fields.
9. If applicable, click Create Unapplied Receipt from the task bar.
TMA
Resources does not recommend unapplied receipts in general. Whenever possible,
apply receipts to orders.
10. Once
changes have been made to a record(s), select the record(s) and click
Validate Transactions from
the task bar.
If the proper changes were made, the status of corrected records will change
to “Validated.” All transactions must be validated before they can be
posted.
11. Click
the Post Transactions link
to post any un-posted validated receipt.
This can also be done by re-running LCK100 in POST mode. Please note that
this is NOT the same as posting the batch.
12. Click Save.
Screen Element |
Description |
|---|---|
Lockbox Information |
|
File ID |
Read-only. Represents the file the batch is from. |
Batch |
Read-only. Represents the batch that is selected. |
Display Filters |
|
All |
Checkbox. Shows all transactions. |
Errors |
Checkbox. Shows only those transactions with errors. |
Posted |
Checkbox. Shows only those transactions that have been posted. |
Un-Posted |
Checkbox. Shows only those transactions that have not been posted. |
Validated |
Checkbox. Shows only those transactions that have been validated. |
Redisplay Info |
Button. Updates the grid to show the appropriate transactions. |
Receipt Information |
|
Add |
Button. Allows you to add another receipt. Defaults as an error until the receipt details are filled out and the receipt is validated. |
Delete |
Button. Removes a receipt from the grid. |
Select All Rows |
Button. Selects all receipts in the table. |
Deselect All Rows |
Button. Deselects any checked receipt on the table. |
Receipt Details |
|
Payor |
Link and text box. The link will open the Customer Chooser window. When the customer has been chosen, his or her ID number will fill in the field and his or her name will display as read-only text below the ID number. |
Order Number |
Link and text box. Clicking the link will open the Order Balance Chooser window. A product can be chosen from the search field and, when selected, the Order Number will fill in the field. The Order Number can also be entered directly into the field. |
Invoice |
Link and text box. |
Post Date |
Text box. The date that this record is posted. Not the transaction date. |
Actual Amount |
Text box. The receipt amount in actual currency applied against the Order Line. |
Exchange Rate |
Text box. The exchange rate of the actual currency of the receipt that is applied against the Order Line. |
Exchange Date |
Drop-down. The exchange rate date of the actual currency. |
Receipt Type |
Drop-down. Indicates the type of receipt for this transaction. |
Currency |
Drop-down. Form of currency being received. |
Reference Number |
Text box. Reference number for the receipt applied against the Order Line number. |
Expiration Date |
Drop-down. |
Error Message |
Text box. Will display the error type if applicable. |
Additional Receipt Distribution |
|
Add |
Button. Adds additional orders to which the receipt will be applied. |
Delete |
Button. Removes orders from receipt distribution. |
Order Number |
Link and text box. The Order Number to which the receipt will be applied. Clicking the link opens the previously mentioned Order Balance Chooser. |
Receipt Amount |
Text box. if the Receipt Amount is edited, then you can alter the batch control record to make the batch balance and post correctly. |