Defining Facility Product Rates and Pricing
The Rate Code Details section is used to create rate structures and
rate codes upon which product prices are based. Rate structures are typically
used to segment customers into logical buying groups.
For discounted room reservations, TMA Resources recommends that you
set up a rate here instead of defining a discount on the Discount Maintenance
screen. Rates are not conditional and are easy to report on. Discounts
have criteria associated with them and may not apply properly to the appropriate
recipients.
The Pricing Detail section is used to associate a price with a given
rate structure and code combination. Products can be priced by date (which
facilitates the creation of early bird rates) or by different currencies.
Accounting policies can be implemented here, including product adjustments,
write-off tolerances, and tax basis.
For facility product setup, product rate codes can be used to define
a unit of time for pricing. For example, if you want to price your rooms
by the hour, then you should create a one hour rate code. Then, on an
order, to charge the use of the room for 3 hours, multiply by 3.
 There
is no link between the rate code and the amount of time selected for a
reservation on the Visual Scheduler. You must manually set the rate code
used on the order.
There
is no link between the rate code and the amount of time selected for a
reservation on the Visual Scheduler. You must manually set the rate code
used on the order.
To define the rates and pricing:
1. Click
Define Rates and Pricing from
the Define the Product task category.
The Rates and Pricing screen displays, as shown below.
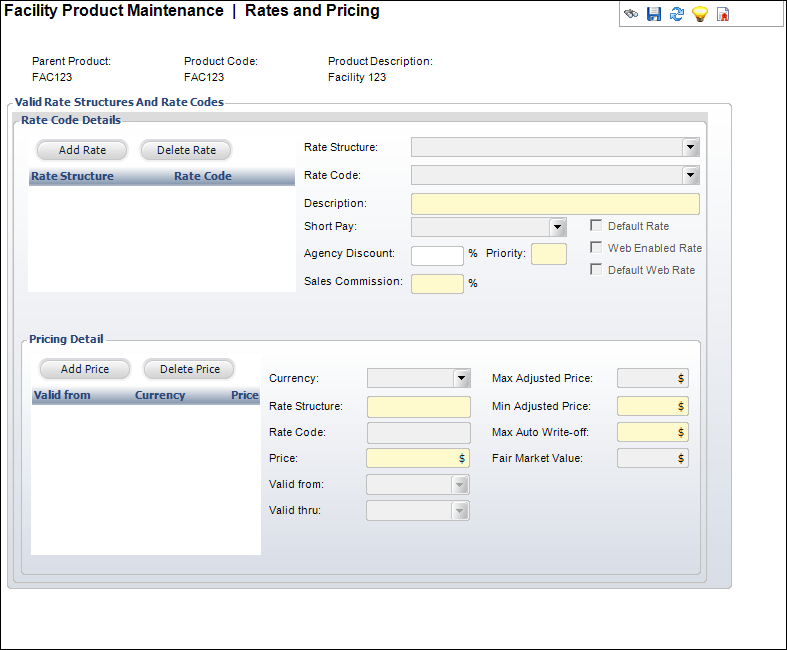
2. Click
Add Rate.
3. Select
a Rate Structure from the drop-down.
4. Select
a Rate Code from the drop-down.
The Description defaults as the Rate Code value.
5. Select
the Short Pay from the drop-down.
6. If
necessary, enter an Agency Discount.
7. Enter
a Priority number.
8. Enter
the Sales Commission.
9. Check
the applicable checkboxes:
· Default
Rate
· Web
Enabled Rate
· Default
Web Rate
10. Click
Add Price.
11. Select
the Currency from the drop-down.
12. Enter
the Price for the meeting.
13. Select
a Valid From date from the drop-down.
14. If
necessary, select the Valid Thru
date from the drop-down.
15. Enter
the Max Adjusted Price amount.
16. Enter
the Min Adjusted Price amount.
17. Enter
the Max Auto Write-off amount.
18. Click
Save.
Screen Element |
Description |
Rate Code Details |
Add Rate |
Button.
When clicked, a row is added to the Rate Code Details table and
the corresponding fields are enabled to add a rate code. |
Delete Rate |
Button.
When clicked, the highlighted row from the table and the rate
code are deleted. |
Rate Structure |
Drop-down.
This is a structure that defines a customer. They are defined
during the system setup. Certain customers, such as members vs.
non-members, receive special rates. The rates for these structures
are defined in the Rate Code.
After a rate structure has been defined
for the product, this drop-down is disabled and cannot be edited. |
Rate Code |
Drop-down.
The established rate determines the pricing for the Rate Structure
selected.
After a rate code has been defined for the
product, this drop-down is disabled and cannot be edited. |
Description |
Text
box. A description of the rate code. |
Short Pay |
Drop-down.
This fixed code indicates how Personify handles incomplete payment
situations. Linked to the minimum payment amount. This code can
be affected by the schedule payment and minimum payment amount.
Options include:
· Adjust: Accept whatever is paid,
even if the payment amount is less than the minimum payment. No
balance is due. This is typically used for donations.
· AR: Creates a receivable and
indicates that members under the active rate code will be invoiced.
Activates even though a balance is due.
· Reject: Do not activate order
unless fully paid. This should only be enacted if paying the entire
amount immediately, rather than monthly. If an order is created,
this value can be overridden at the order line level. A balance
is due and the product stays in a proforma status until payment
is received. Not active until the entire payment is received. |
Ship-Via |
Drop-down.
Override how the product is to be shipped, e.g., by Federal Express,
United Parcel Service, or United States Postal Service. This is
not typically used with meeting products. |
Priority |
Text box.
Determines the order the rate codes display in the product setup
and Order Entry screen. The rate code with the lowest display
order displays first.
|
Agency Discount Percent |
Text
box. The percentage to be applied for an agency discount when
creating an order for this product. |
Max Free Badges |
Text
box. Limits the number of badges this rate code can have. Registrants
will receive, at maximum, this number of badges when they purchase
the meeting parent product. These badges are not listed on the
base registration lists. Any badges requested beyond the number
specified here require the purchase of the “Badge” meeting product. |
Component Package |
Link.
When clicked, the Product Chooser screen displays where you can
add a component package by rate structure/rate code combination. |
Default Rate |
Checkbox.
Defaults the rate to the list price. Indicates which rate codes
should be default with each rate
structure. This rate code defaults for the order when creating
an order. For instance, some organizations want to show member
savings, but to do that the structure and price must be known
to consider the “list price.” Only one rate code within a given
rate structure for a product can have this checkbox selected. |
Web Enabled Rate |
Checkbox.
When checked, indicates that this rate code is available for use
through the Web. |
Default Web Rate |
Checkbox.
When checked, indicates which rate code is the default for the
Web. |
Waive Shipping |
Checkbox.
When checked, the shipping will be waived for this rate structure/rate
code for this product. |
Pricing Detail |
Add Price |
Button.
When clicked, a row is added to the Pricing Detail table and the
corresponding fields are enabled to add a pricing structure. |
Delete Price |
Button.
When clicked, the highlighted row from the table and the pricing
structure are deleted. |
Currency |
Drop-down.
The appropriate domestic or international currency to use in this
subsystem, e.g., German Mark, Japanese Yen, US Dollar. |
Rate Structure |
Read-only.
This is a structure that defines a customer. They are defined
during the system setup. Certain customers, such as members vs.
non-members, receive special rates. The rates for these structures
are defined in the Rate Code. |
Rate Code |
Read-only.
The established rate determines the pricing for the Rate Structure
selected. |
Price |
Drop-down.
The price charged for the product prior to any applicable discounts. |
Valid From |
Drop-down.
The pricing setup begins on this date. It is based on the order
date in the order application. If a begin date is defined prior
to an existing begin date, a warning message appears. If entered,
then the end date is automatically set to the day prior to the
next existing begin date. |
Valid Thru |
Drop-down.
Indicates the last date when this rate would be effective for
this product detail. |
Max Adjusted Price |
Read-only.
Controls adjustable pricing and is ignored for other short-pay
codes. When the Short Pay code is ADJUST, the system adjusts up
only to this price. It is visible only if Short_Pay flag = “ADJUST”.
When the short pay code is “ADJUST”, the price will only adjust
down to this amount. If less is paid, then the line item will
not be activated. |
Min Adjusted Price |
Read-only.
Controls various aspects of the behavior of an order depending
on the Short Pay value. This is the price that must be paid prior
to the line item being considered active. When placing bill-me
orders (typical of INV, MTG, SUB), the minimum should be zero
(meaning that the order can be placed prior to any money being
paid). |
Max Auto Write-off |
Text
box. Controls what amount is acceptable as a final price. |
Taxable Amount |
Text
box. Exists for products where only a portion of the product is
taxable. Visible only if Short_Pay flag = “ADJUST.”
When the short pay code is “ADJUST,” it
will adjust up only to this price. It defaults to the Price. |
|